Blocked Ports Database

Below is a user submitted Internet service provider database of blocked ports.
If you don’t see yours below please add it.


Search:

Add your Internet Service Provider’s information to the database:

Internet Service Provider:


City, State:


Service Type:


Ports Blocked:


Download / Upload Speed (mbps):


Date:


Internet Service ProviderCity, StateService TypePorts BlockedDownload / Upload Speed (mbps)Date
Cox communicationsLas Vegas, NVResidential with Dynamic IPPort 80 Only100/102018-09-01
Matanuska Telephone AssociationEagle River, AKResidential with Dynamic IPNone20/52018-09-01
Verizon WirelessNew York, NYResidential with Dynamic IPNone50/502018-09-01
Charter CommunicationsAtlanta, GeorgiaResidential with Dynamic IPNone130/132019-03-26
Triangle CommunicationsRural MTNot SureNone50/102019-03-26
RogersWaterloo, OntarioResidential with Dynamic IPNone1000/502019-03-26
SpectrumOrono, MEResidential with Dynamic IPNone100/102019-03-26
Deutsche TelekomHannover, GermanyResidential with Dynamic IPNone100/402019-03-26
SpectrumDelaware, OHResidential with Dynamic IPNone100/102019-03-26
CableOneBoise, IDBusiness with Static IPNone100/202019-03-26
TelusVancouver, BCBusiness with Static IPNone65/142019-03-26
ComcastCentennial, COResidential with Dynamic IPNone250/252019-03-26
CenturyLinkKeizer, OregonResidential with Dynamic IPNone1000/10002019-03-26
AT&T U-VerseDetroit, MIResidential with Dynamic IPNone50/102019-03-26
1 und 1Berlin, GermanyResidential with Dynamic IPNone100/402019-03-26
DNSnetBerlin, GermanyResidential with Dynamic IPNone100/102019-03-26
Frontier FiosHermosa Beach, CABusiness with Static IPNone300/3002019-03-26
KPNEindhoven, NetherlandsNot SureNone100/1002019-03-26
ANTEC ServicepoolHannover, GermanyBusiness with Static IPNone444/202019-03-26
Virgin MediaManchester, UKResidential with Dynamic IPNone350/202019-03-26
Virgin MediaShropshire, UKResidential with Dynamic IPNone100/62019-03-26
SpectrumTampa, FLResidential with Dynamic IPNone200/200... Had to call to unblock all ports.2019-03-26
MaxxSouthStarkville, MSResidential with Dynamic IPBoth 80 and 443110/52019-03-26
ComcastAnn ArborResidential with Dynamic IPNone150/152019-03-26
VoyagerAuckland, New ZealandResidential with Dynamic IPNone150/152019-03-26
Midcontinent CommunicationsGrand Forks, NDResidential with Dynamic IPNot Sure150/152019-03-26
Optus NBNMelbourne, AustraliaResidential with Dynamic IPNone100/402019-03-26
Google FiberKansas City, MOResidential with Dynamic IPNone1000/10002019-03-26
ComcastEastern ConnecticutResidential with Dynamic IPNone1000/302019-03-26
Visionary Broadband WirelessGillette, WYResidential with Dynamic IPNone50/52019-03-26
BellHalifax, Nova ScotiaResidential with Dynamic IPNone500/5002019-03-26
British TelecommunicationsHertfordshire, UKResidential with Dynamic IPNone30/72019-03-26
TelenorStockholm, SwedenNot SureNone250/2502019-03-26
SFRAngers, FranceNot SureNone400/502019-03-26
Wave-GSeattle, WAResidential with Dynamic IPNone1000/10002019-03-26
SpectrumNorth Adams, MAResidential with Dynamic IPNone400/202019-03-26
AT&TRaleigh, NCResidential with Dynamic IPNone1000/10002019-03-26
State Tel Inoc IncCoxsackie, NYResidential with Static IPNone250/1002019-03-26
SpectrumAustin, TXResidential with Dynamic IPNone200/202019-03-26
Verizon FiosBear, DEResidential with Dynamic IPNone960/8802019-03-26
Telstra DOTTasmania, AUBusiness with Static IPNone50/202019-03-26
MidCoAnoka, MNBusiness with Static IPNone800/1002019-03-27
TelusVancouver, BCBusiness with Static IPNone950/9502019-03-27
ShawVancouver, BCBusiness with Dynamic IPNone600/1002019-03-27
IINETQueensland, AUResidential with Dynamic IPNone100/402019-03-27
Charter SpectrumCarolina Beach, NCResidential with Dynamic IPNone100/102019-03-27
ShawEdmonton, CanadaBusiness with Static IPNone150/152019-03-27
ShawKelowna, CanadaResidential with Dynamic IPNone15/22019-03-27
So-netTokyo, JapanResidential with Dynamic IPNone2000/10002019-03-27
Pavlov MediaRochester, NYResidential with Dynamic IPNone400/4002019-03-27
Charter / SpectrumBeloit, WIResidential with Dynamic IPNone940/1002019-03-27
Charter / SpectrumSt. Louis, MIResidential with Dynamic IPNone100/102019-03-27
Cincinnati BellCincinnati, OHResidential with Dynamic IPNone1000/2502019-03-27
SpectrumLa Canada Montrose, CABusiness with Static IPNone100/102019-03-27
BTESBristol, TNNot SureNone915/932019-03-27
Spark NZAuckland, New ZealandResidential with Dynamic IPNone900/4502019-03-27
Teksavvy CableToronto, ON, CanadaResidential with Dynamic IPNone30/52019-03-27
ComcastHouston, TXResidential with Dynamic IPNone1000/402019-03-27
Bell BusinessMontreal, CanadaBusiness with Static IPNone940/9402019-03-27
Edpnet.beEast-Flanders, BelgiumBusiness with Static IPNone100/402019-03-27
TelenetEast-Flanders, BelgiumResidential with Dynamic IPNone50/52019-03-27
STRATA NetworksVernal, UTResidential with Dynamic IPNone100/252019-03-27
Verizon FiOSArlington, VAResidential with Dynamic IPNone1000/10002019-03-27
OoredooDoha, QatarResidential with Dynamic IPNone500/1502019-03-27
TelstraMelbourne, VictoriaResidential with Static IPNone40/202019-03-28
ElisaEspoo, FinlandResidential with Static IPNone100/102019-03-27
AT&TCleveland, OHResidential with Dynamic IPNone1000/10002019-03-27
FullChannelWarren, RIResidential with Dynamic IPNone300/502019-03-27
WifireMoscow, RussiaResidential with Dynamic IPNone150/1502019-03-27
WOWColumbus, OHResidential with Dynamic IPNone500/502019-03-27
AT&TDaytona Beach, FLResidential with Dynamic IPNone10/0.852019-03-27
DeltaVlissingen, NetherlandsResidential with Dynamic IPNone250/152019-03-27
DirectTV NetArgentinaResidential with Dynamic IPBoth 80 and 44330/52019-03-27
TPGLaunceton, TasmaniaResidential with Dynamic IPNone100/402019-03-27
BahnhofStockholm, SwedenResidential with Dynamic IPNone1000/10002019-03-27
K-netCopenhagen, DenmarkResidential with Dynamic IPNone2000/20002019-03-27
ShawCalgary, Alberta, CanadaResidential with Dynamic IPNone300/202019-03-27
VNPTHanoi, VietnamResidential with Dynamic IPBoth 80 and 44370 Call to unblock ports2019-03-27
Fibia/WaooRingsted, DenmarkResidential with Static IPNone500/5002019-03-27
Verizon FiOSArlington, VAResidential with Dynamic IPNone1000/10002019-03-27
XS4ALL / KPNGroningen, NetherlandsResidential with Dynamic IPNone113/332019-03-27
Net VirtuaSao Paulo. BrazilResidential with Dynamic IPBoth 80 and 44310/12019-03-27
EPBChattanooga, TNResidential with Dynamic IPNone300/3002019-03-27
1&1Berlin, GermanyResidential with Dynamic IPNone502019-03-27
A1Tulln, AustriaBusiness with Static IPNone150/202019-03-27
Deutsche TelekomKarlsruhe, GermanyResidential with Dynamic IPNone2/12019-03-27
VodafoneLubeck, GermanyResidential with Dynamic IPNone200/252019-03-27
FreeSaint Leu la Foret, FranceResidential with Dynamic IPNone5/0.52019-03-27
Aussie BroadbandMelbourne, AustraliaResidential with Dynamic IPBoth 80 and 44350/20 Call to unblock ports2019-03-27
CenturyLinkWestminister, COResidential with Dynamic IPNone100/102019-03-27
IINetTasmania, AustraliaResidential with Dynamic IPBoth 80 and 44312/1 Call ISP to Unblock2019-03-27
Comcast XfinityPhilidelphia, PAResidential with Dynamic IPNone1000/352019-03-27
Verizon FIOSBrooklyn, NYResidential with Static IPNone1000/10002019-03-28
Bell CanadaToronto, CanadaResidential with Dynamic IPNone1000/7502019-03-29
AT&THouston, TXResidential with Static IPNone1000/10002019-07-31
Philadelphia, pa
Residential with Dynamic IPNone1080 is blocked by comcast says so on there own website in california anyway i have reported it many times and u guy send spam replys with 0 info sad. (dl up to 10mbs/ul 5mbs ) max at night2020-02-18
Cox
Oklahoma
HyperopticUKResidential with Dynamic IPBoth 80 and 4433002020-04-12
Residential with Dynamic IPNot Sure
Choctaw, OKResidential with Dynamic IPNone941/352020-05-13
Residential with Dynamic IP
'
\
'--
ORDER BY 100
spectrumsummerville, scResidential with Dynamic IPNot Sure
spartannet
Residential with Dynamic IPNot Sure
ZAPZAPResidential with Dynamic IPNoneZAP2023-08-21

Comparisons and Benchmarks

Cost

Do you have a website that you plan on keeping for a while?
You might not think about it but hosting a simple website can cost you $1000’s in the long run.

Here is a cost comparison of a few popular basic hosting services against the MicroWebPi.

With these basic hosting plans, your site will share a server with hundreds of other websites. When there is an increase in traffic to the other sites, it will drag your site down as well.

SquareSpace charges more than double if you want to sell products on your site.

Bluehost and others will throttle your site if you have too much traffic. Many other hosts like Siteground say their basic plan is suitable for only 5000 page views per month. The MicroWebPi can easily handle 10,000 page views in an hour.

The MicroWebPi is a dedicated server that can provide you more control, better performance and massively reduced costs, especially if you have multiple sites.

Optimizations

Many factors affect website performance, below is a summary of optimizations that were made to get this site to load in the 400 ms range.

That is better than 97% of all websites that have been tested using Pingdoms website speed tool at :tools.Pingdom.com

Having a sufficient upload speed, enabling caching and optimizing image sizes is crucial for good website performance.

Stress Testing

A stress test of Hostyourownsite.com is shown below with 50 concurrent users producing 422 page views in 123 seconds.
All urls are successfully loaded and the response time remains relatively flat throughout the test which indicates server stability.
There is a peak request rate of 220 requests per second, that’s over 25,000 page views an hour.


What is a web server and how the Internet…

What’s A WordPress Web Server?

The Internet is a large collection of computers that communicate with each other.
Every website you’ve ever visited is a collection of files that are stored on one or more computers somewhere in the world.
These computers are known as web servers, they are on 24/7 and they respond to requests for information by processing and uploading the files to the client.

When you visit a website, your web browser is the client. Your web browser sends out the initial request for information and then receives the website files from the server, it then interprets these files and displays them for you to view.

WordPress is the web’s most popular Content Management System powering more than 30% of all websites, It provides an easy interface for users to create and manage these website files without ever having to learn how to code. The WordPress community provides thousands of different themes and plugins to choose from so that you can find exactly what you’re looking for. There are hundreds of tutorial’s available on the web for any questions you might have.

How Does The Internet Work ?

Who knows, its mystery.

Just kidding, but come on, we live in the information age and if we are active users of the internet we should at least have a decent understanding of how it works.

Computers on the web talk to each other using the Hyper Text Transfer Protocol over the Internet Protocol Suite which consists of the Transmission Control Protocol and the Internet Protocol.
Also known as HTTP over TCP/IP.
Did I lose you yet? If so don’t worry about it.

Lets give an analogy to letters in the mail.
HTTP is like the contents and format of the letter, the browser and server both know how to read it. Web browsers automatically send this through TCP port 80.
HTTPS is like an encrypted letter where only the sender and receiver know the pass key to interpret it. Web browsers automatically send this through TCP port 443.
TCP is like certified mail service through the post office, it makes sure the data gets delivered, it also chops your letter into tiny pieces and sends them across the internet, deals with congestion and then reassembles them at their destination.
IP is the address and zip code system the post office uses to get the letter delivered to you.

Now Lets run through a practical example that you actually need to understand.

When someone types a web address into a browser say, http://www.HostYourOwnWebsite.com the web browser sends an HTTP request out through TCP port 80.
This request travels through your home internet router to a library often at your Internet service provider called a Domain Name Server.
The DNS translates the easy to remember domain name HostYourOwnWebsite.com into an actual IP address say 216.137.198.132.
This is the IP address of the cable modem that the web server is connected to but not necessarily the local IP address of the web server.
The DNS routes the request from the browser to the cable modem which forwards the request to the web server’s local router.
The router is set up to forward all traffic on port 80 to the local IP address of the web server, otherwise it doesn’t know which computer on the network to send it to. The local IP address often looks like 192.168.1.2.
The web server’s server program, i.e. NGINX, is configured to listen on port 80 for the domain www.HostYourOwnSite.com, it then responds with the appropriate information which makes its way back to the client and alas, a webpage is loaded.

DNS Details

When you register for a domain such as HostYourOwnWebsite.com, say through a paid domain registrar like NameCheap or a free domain registrar like Freenom,  you have to specify what your web server’s IP address is. The registrar then propagates your IP address to all the DNSs around the world. If your web server has a residential internet service, its likely that your have a dynamic IP address that changes from time to time, even after a cable modem reset. The solution is to use a Dynamic DNS service that keeps track of your IP address and updates it. Dynu.com offers a free DDNS service and it can be used by signing up for a free account at Dynu and pointing your domain name to use Dynu’s DNS servers which is an option under the domain registrar’s control panel. A periodic script then runs on the server and keeps the IP address updated.

Blocked Ports and Intranet

Some residential internet service providers block incoming traffic on port 80 and 443 or severely limit upload speeds as a way to prevent the use of home web servers as its against their Terms of Service, so please call your ISP and double check before trying to do so. Note that there’s nothing different about port 80 or port 443 except that its the convention that web browsers use.
You can actually use a different port but you’ll have to specify it in the URL like www.HostYourOwnWebsite.com:81 and that’s annoying.
If your ISP doesn’t allow web servers and you don’t want to risk being scolded for trying, you can still set up a web server that only serves your local home network.
This is useful in developing test websites and projects before going live with them on another hosting solution or setting up a business intranet.

Simple Guided Setup With The MicroWebPi

It all seems a little overwhelming but with the MicroWebPi, all server side configuration is automatically done for you. All you need to do to make your site live is register for a domain, point it to your MicroWebPi or to Dynu, set up your router to forward traffic to your MicroWebPi’s IP address and run the automatic installer.

How Do Web Servers Work And What Is Caching?

Some parts of the website change every time you visit it or change depending on who is visiting it, this is known as dynamic content. It is generated on the server from web page building instructions right before being sent to the client. These instructions are known as server side scripts and in WordPress’s case, they are written in the PHP language.  Every time a request for dynamic content is made to the web server, the web server processes the script which uses the servers computational power and therefore takes more time. If too many of these request are made at the same time, the server can become overloaded which will result in a slow or unresponsive website. Some hackers intentionally bombard websites with 100’s of thousands of requests per second to take down websites they don’t like or run up their monthly hosting fees.

Some files are the same for all users and never change, this is known as static content. Static content doesn’t need to be processed by the web server before uploading so its pretty fast.

Sometimes static content that rarely changes is generated by a server side script on every request, this is a waste of resources and makes your website slower than it needs to be. We can save this generated content for later in a special folder called a cache so that additional requests can be server faster. Server- side caching can greatly improve your website’s performance and the MicroWebPi is automatically configured to do so.

If you visit a website many times a day or week it doesn’t make sense to keep downloading the same static content again and again from the server, that is why there is client-side caching also known as browser caching. Your web browser will save the website’s static content right on your own computer so that those requests don’t have to travel across the internet and spend time uploading and downloading. This greatly speeds up the website performance but only after the first visit.

Note that if you update your web page’s static content, users may not see it until you refresh your server side cache and their browser side cache expires.


Installation Requirements

Requirements to get your website LIVE on the internet.

If you want to be able to access your MicroWebPi’s websites from the entire internet using a normal domain name you’ll have to make sure your home network meets a few requirements:

Incoming traffic on TCP port 80 must not be blocked by your internet service provider.

-If this port is blocked you will not be able to access your site outside your local network without typing a non-standard port in the browser ie. Hostyourownwebsite.com:81.
-Port redirection and masking are other options but can result in a poor user experience so it is not currently supported by the automatic installer.

Incoming traffic on TCP port 443 must not be blocked by your internet service provider if you would like to encrypt your traffic.

– Encryption is highly recommended for sites that process sensitive data like online stores.
– If port 80 is blocked but port 443 is not, the automatic SSL certificate installer/renewer will not work. Other means of certificate installation are possible but not currently supported by the automatic installer.

Your internet upload speed is sufficient to handle your estimated traffic.

-Part of your website’s speed and ability to serve multiple users at the same time is dependent on the upload speed of its internet connection.
-Reduce the load on your network by keeping your web page size small and by using a Content Delivery Network.
-Check Comparisons and Benchmarks to see the performance gains from going from 5 mbps to 50 mbps on this website.

-It’s important to note that for many internet service providers, hosting a website on residential service is against their terms of service. If you develop significant traffic your ISP could notice the increase in upload data usage and scold you over it.

To find out if your ports are blocked you can:

If you don’t know what these things mean then please check out: What is a web server and how the Internet works.

Whats a LEMP stack?

The Raspberry Pi is an affordable yet powerful single board computer. It runs a Linux variant known as Rasbian for its operating system. Linux is the favored OS for web servers due to its efficiency and stability.

NGINX (Read Engine X) is a a high performance web server with a strong focus on low memory usage and high concurrency. A perfect match for the Raspberry Pi.

MariaDB is a database server. Its how WordPress keeps track of data. Noteable users are Wikipedia and Google.

PHP is the programming language that WordPress uses behind the scenes. Version 7.3 is 2-3x faster than version 5.


WordPress is a website management software that helps anyone build custom websites without knowing any code. 1000’s of themes and plug-ins are available to customize your site. Over 30% of the Internet uses WordPress

Installation Instructions

Welcome to the installation instructions, follow the guide below to get up and running.

– For hosting a site on the World Wide Web: Verify Installation Requirements and start from step 1.
– For hosting a local “Intranet” or development only site:Start at step 4 and skip steps 5,7 and 8.

Step 1: Obtain a Domain Name

First, you’ll need to come up with a website address, see if its available and obtain it.

  • Free custom domain names offer non traditional suffixes such as .TK , .CF, .GA .
  • Paid custom domain names offer traditional suffixes as such as .COM, .NET, .ORG, etc .
  • We recommend Freenom for free domains and Namecheap or Dynu for the most affordable and convenient paid domain name registrars.
  • Search for your desired domain name, sign-up for it and continue onto step 2.

Find a domain starting at $0.88

powered by Namecheap

Step 2: Configure your domain for Dynamic or Static IP Address Service

After you’ve selected and obtained your domain name, we will need to have it direct requests to your MicroWebPi.

  • If you have a Dynamic IP address, we will direct your domain name to Dynu’s Dynamic DNS service which will then redirect to your changing IP address in step 3.
  • If you have a Static IP address, we can simply point your domain directly to your network’s IP address and skip step 3.
  • To check if you have a dynamic IP address:
    Go to Whats My IP? This is your External IP address, write it down.
    Reboot power to your router and check your IP address again.
    If its different: You have a Dynamic IP address.
    If its the same: You have a Static IP address.

Select your set up:

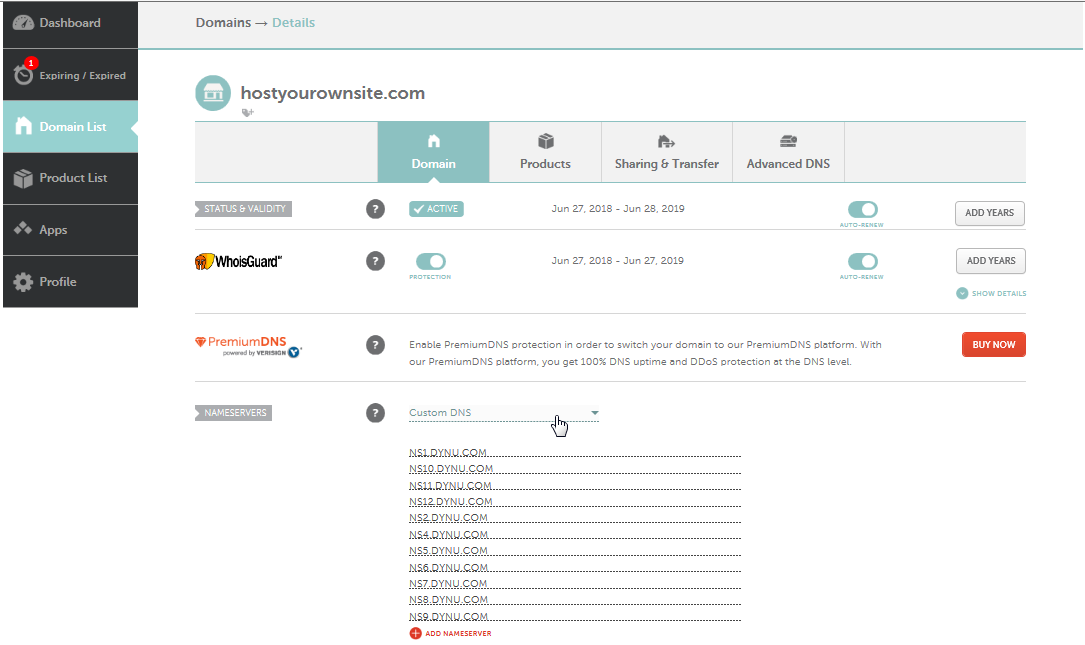
  • Paid Domains with Dynamic IP: Forward your name servers to Dynu's name servers

    General instructions: 
    Every domain name registrar will have an option to manage domain name settings, there, you should find an option to use custom name servers, we will need to forward these to Dynu’s name servers to enable Dynamic DNS.

    Namecheap Instructions:
    After you’ve purchased your domain and login to your account:

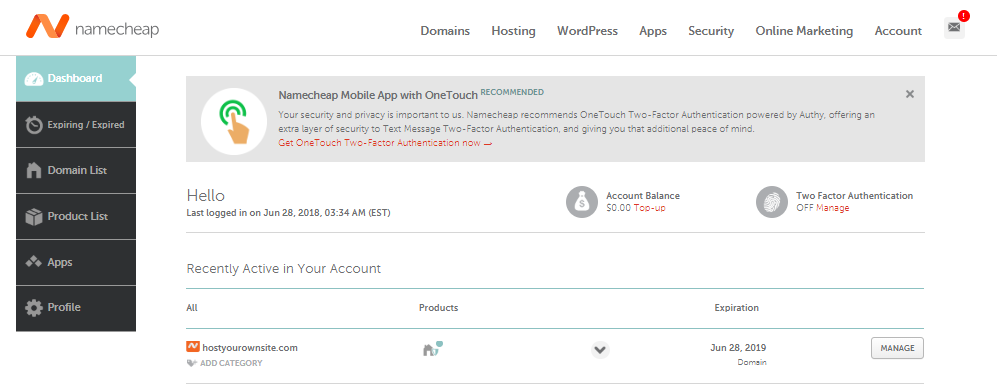
    • From the Dashboard select Manage.

    • The name servers are: NSX.Dynu.com, Where X can be 1 through 6 for US name servers and 7 through 12 for international, you can use one, some or all, this site uses all but number 3. Check Dynu name server locations for more details.

    Continue onto Step 3.

  • Freenom Domain with Dynamic IP address: Forward your name servers to Dynu's name servers
    After you’ve selected and your domain name, we will need to point your domain to Dynu’s DDNS server which keeps track of your changing network IP address:

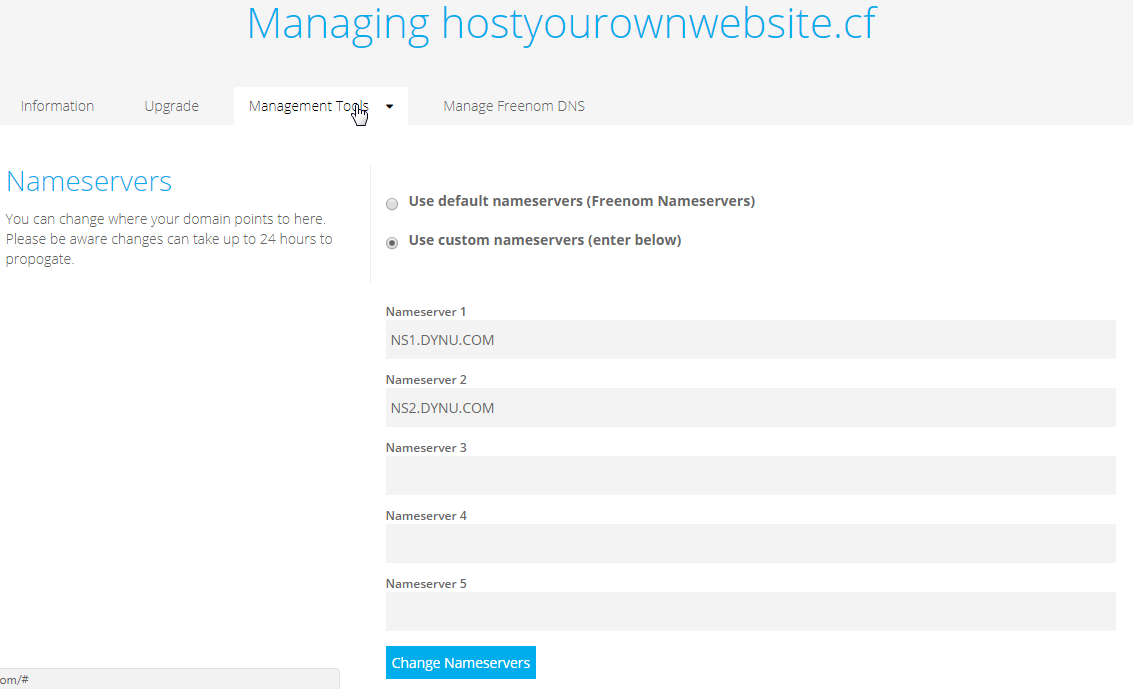
    • As soon as you pick your domain name and click continue, you will be able to change the renewal period to 12 Months, select “Use your own DNS”. Enter NS1.DYNU.COM and NS2.DYNU.COM.
    • You will then be prompted to sign up for an account and verify your email address.

    • Once your account is verified, you can log in and under Management Tools > Nameservers, you can add additional Dynu Nameservers.
    • The name servers are: NSX.Dynu.com, Where X can be 1 through 6 for US name servers and 7 through 12 for international, you can use one, some or all, this site uses all but number 3. Check Dynu name server locations for more details.

    Continue onto Step 3.

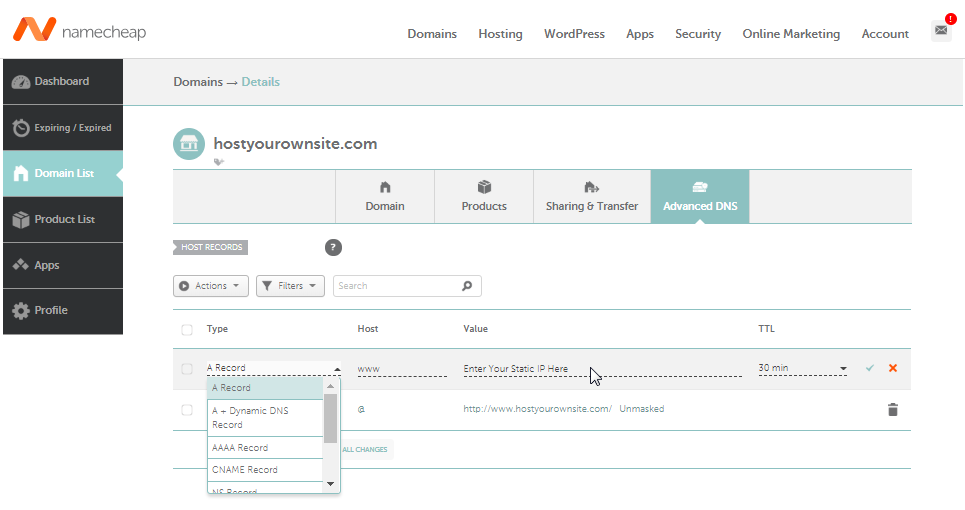
  • Either Domain with Static IP address: Forward your "A Record" to your IP address

    You’ll simply need to add your IP address to the “A record” for your domain name.

    That’s it, skip step 3 and continue to step 4.

Step 3: Setup Dynamic DNS service for your Dynamic IP address

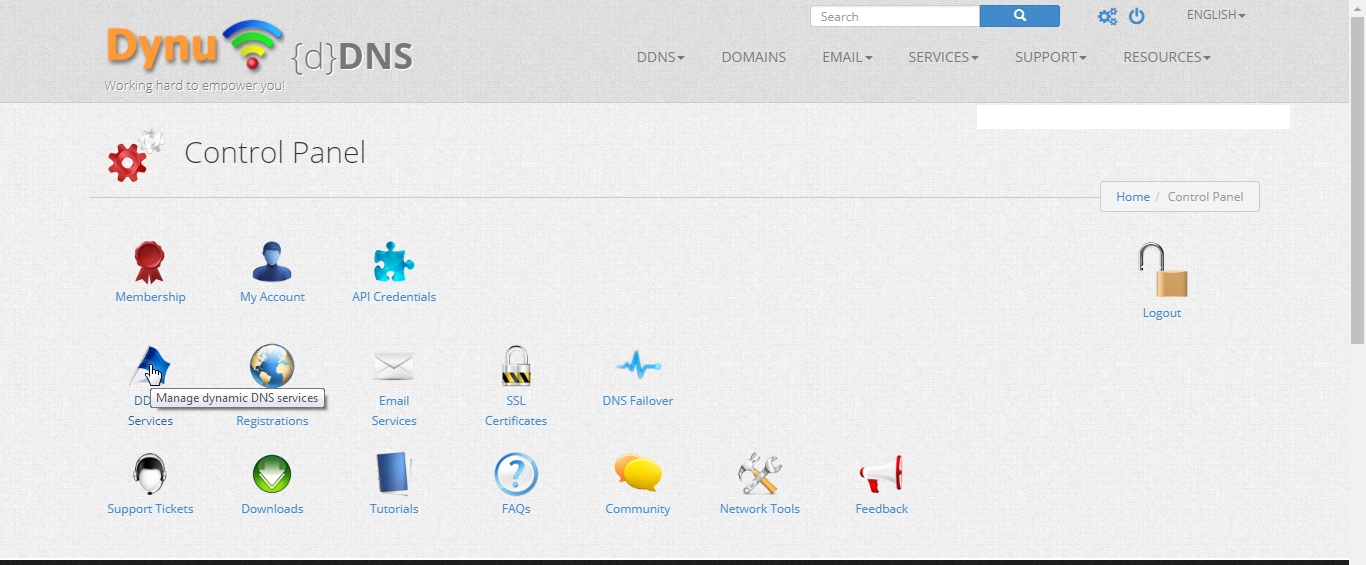
Sign up for a free account at Dynu.com and click DDNS Services from the control panel.

Select + Add for adding your domain.

Type in your domain name under option 2 and select Add.

Your domain is now added, you should be able to see it under DDNS service.

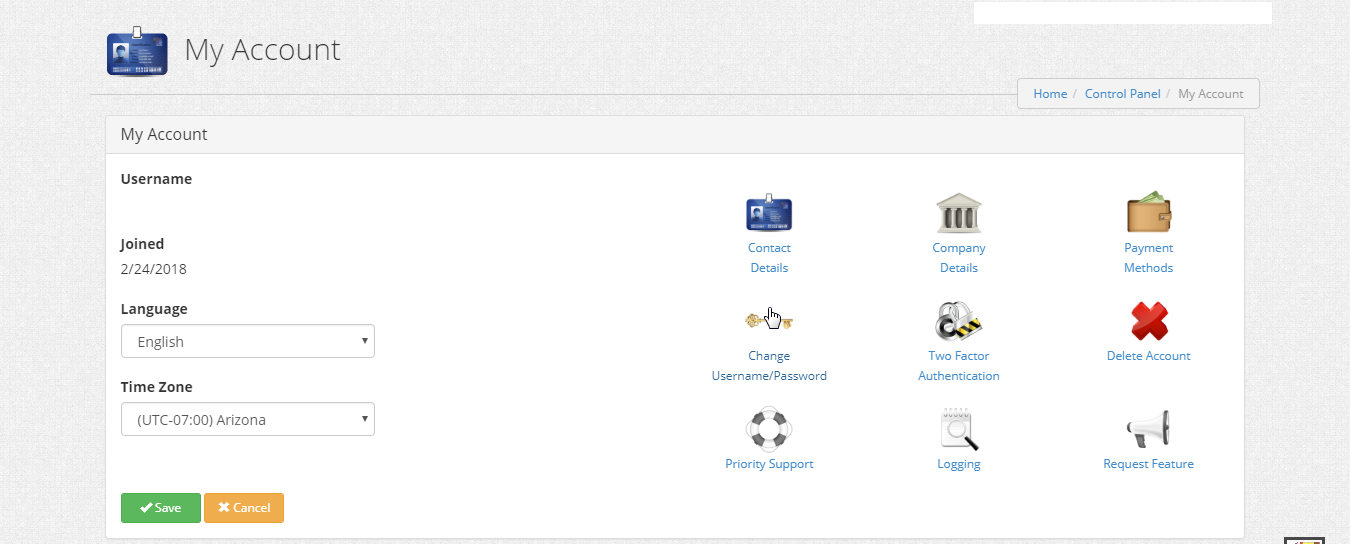
Next, back under the control panel, navigate to My Account and select change password.

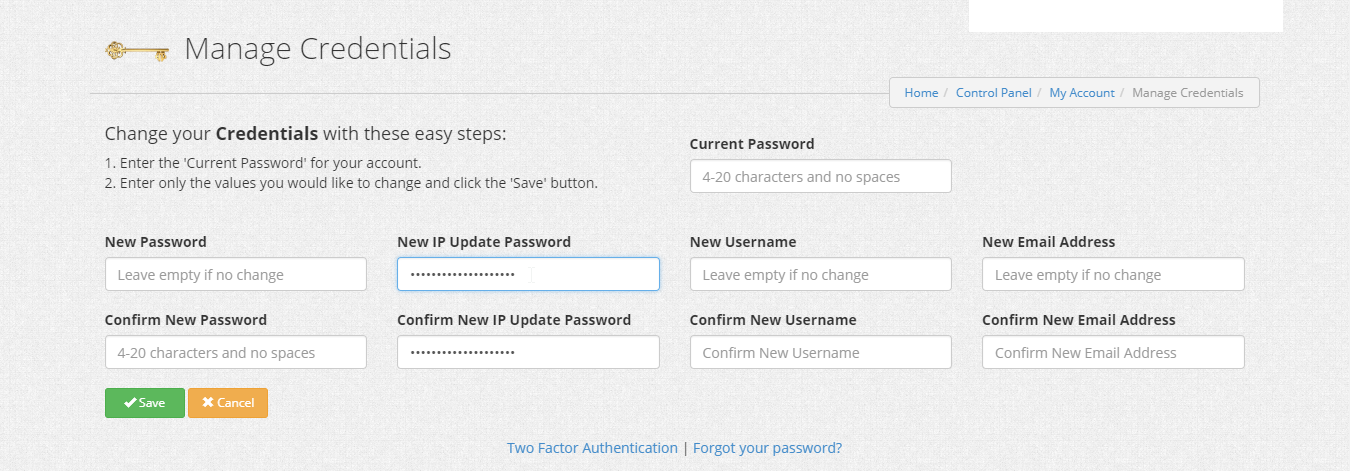
Enter your current password, add a new IP Update Password and click save. Remember this password, you will need it when running the MicroWebPi installer.

You are now finished with Domain name configurations.

Step 4: Connect your MicroWebPi.

    • Plug in an ethernet cable from your router to the MicroWebPi.
    • Plug in an HDMI monitor or tv, keyboard, mouse and plug in the power cable.
  • If you don't have a monitor/keyboard/mouse you can use another computer or even a phone to remote into your MicroWebPi.
        • On your other computer/phone, download the program: VNC Viewer.
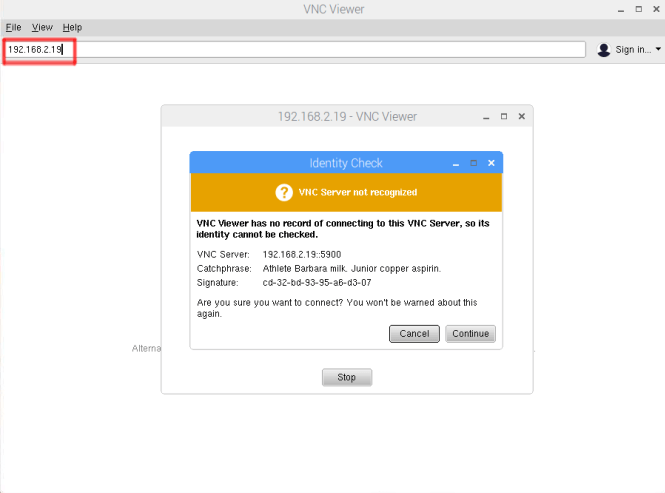
        • Add your MicroWebPi to the VNC Viewer’s address book by typing in your MicroWebPi’s local IP address.
        • You can obtain the Local IP address by referring to step 5.
        • Default Username: MWP_User and Default Password: changeme

    • Select Continue and you will have remote access.
  • The MicroWebPi will boot to the desktop.
  • Personalize your hostname, change your password and update your localization settings by going to the start menu>preferences>raspberry pi configuration. The MicroWebPi will restart.

Step 5: Configure Router to Forward Port 80 and Port 443.

*Note that every model and brand of router might name its options differently, if you get stuck, please check out our Support Forum, post a question and we will respond.

  • From any computer on your network, log into your router’s configuration web page.
    • Usually you can reach this by typing in one of the following addresses into a web browser: 192.168.1.1 or 192.168.2.1.
    • Look for the address, user name and password on a sticker on your router.
    • If you can’t find the login credentials search online for default credentials or check on our forum; common credentials are user: admin, pw: password.
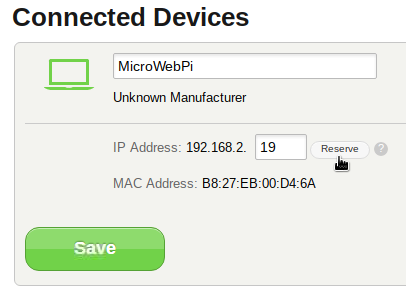
  • Routers like ISPs often issue dynamic IP addresses to the devices that connect to their local networks, we will need to stop this for Port Forwarding to be effective.
    • Find the list of connected devices and their IP addresses.
    • Make note of the MicroWebPi’s assigned IP address.
    • If there is an option to lock or reserve that address,  do so.

    • Some routers do not have a separate setting to reserve static IP addresses but do so automatically for the addresses used in Port Forwarding.
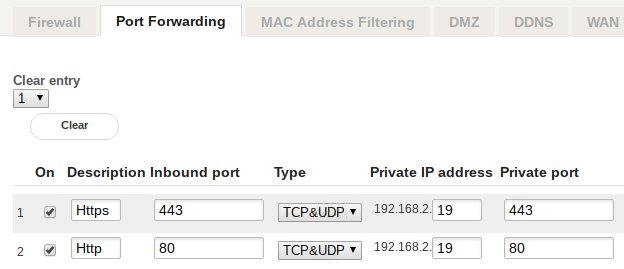
  • Find the settings for Port Forwarding, they are often under the advanced, security or firewall settings.
    • Forward incoming TCP port 80 to the MicroWebPi’s IP address. This may show up as HTTP service. If it also asks for an outgoing port, select port 80.
    • Forward incoming TCP port 443 to the MicroWebPi’s IP address. This may show up as HTTPS service. If it also asks for an outgoing port, select port 443.
    • Note various naming conventions: Incoming=Inbound=External=Public  and Outgoing=Outbound=Internal=Private=Local

  • Continue onto step 6

Step 6 : Run MicroWebPi Installer.

Finally, we are ready to run the website installer.

  • Run the MicroWebPi’s Installer located on the desktop.
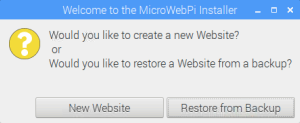
  • Select if this is a new installation or a restore of an existing website.
  • The following screen will pop up along with a copy of these instructions:

  • Enter the domain name and suffix you own.
  • Enter a database username and password.
  • This password will be used for the creation of the unique database user for this domain. You will only need this to directly edit your database (rare).
  • Enter a root user database password, you will need to remember this for any additional website installs.
  • Enter your IP update password for Dynu.com or leave blank if you have a static IP address.
  • Select OK to continue.
  • The Server software has been preinstalled to save you time, if for some reason it is missing it will be detected and reinstalled.
  • Your WordPress website will be installed and configured with the server and database.
  • Select No if you have previously installed the server software.
    • This will install another WordPress website onto the server.
  • Verify your information and select Continue to begin the installation.

  • After installation is complete your website should automatically open.
  • Before you get carried away continue onto the next steps.

Step 7: Verify Site is Live on a Separate Network.

  • Use your phone, turn off wifi, and type in your domain name into the address bar.
  • If it works, congrats! Your website is live, but your traffic is not encrypted,  continue onto Step 8.
If it doesn't work:
  • Wait 10 minutes and try again.
  • If it still doesn’t work, check out the troubleshooting guide.
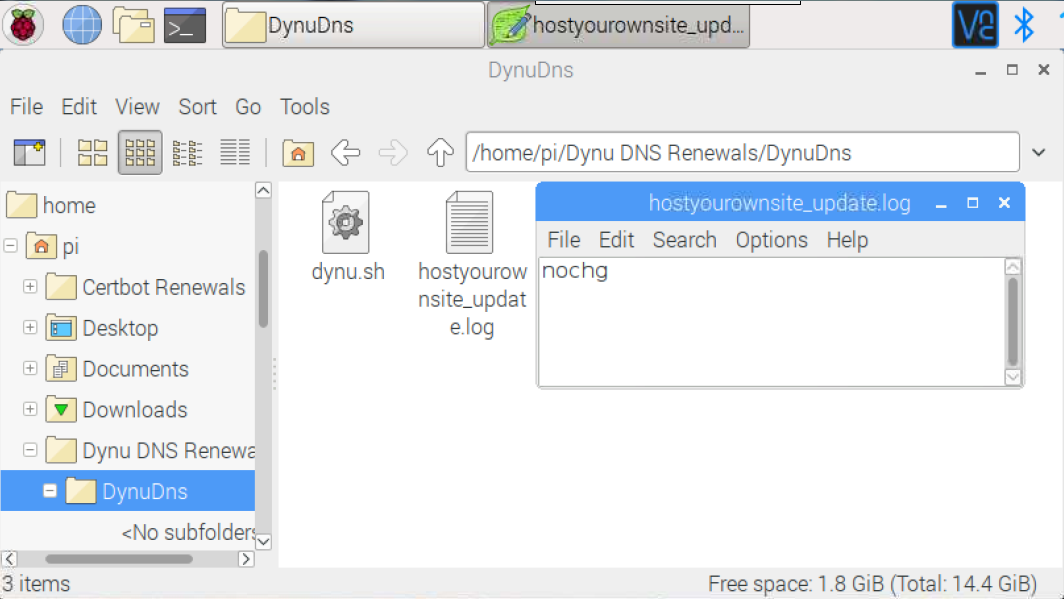
  • The DDNS updater might not have run or might be improperly configured.
    • Open the file manager and navigate to /home/pi/Dynu DNS Renewals/DynuDns, and open the update log. It should read NoChg or Good. 
    • If it says BadAuth then the password in dynu.sh is incorrect. You can check and change it here:
  • Your port forwarding settings might not be correct:
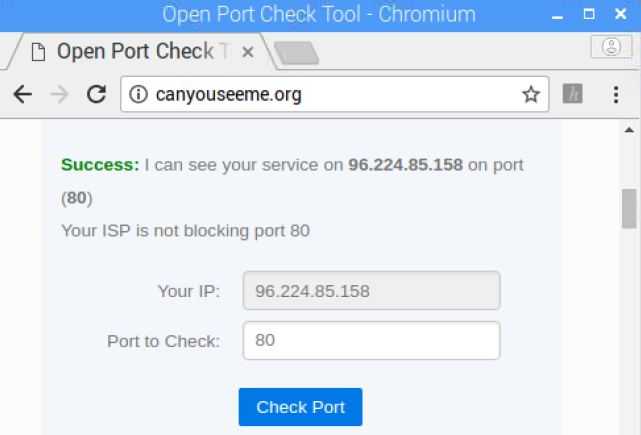
    • On your MicroWebPi, go to Canyouseeme.org and check if Port 80 and port 443 are open.
  • If the the above fails:
    • Check to make sure that the Port Forwarding setting are correct, its possible that the MicroWebPi’s IP address changed if it was not properly reserved.
    • Call your ISP and verify that port 80 and port 443 are not blocked.
  • If you still have problems check out our forums or email us at Support@HostYouOwnWebsite.com, we will be glad to help.

Step 8: Run SSL certificate installer to Enable HTTPS Encryption.

Once you are able to reach your website from an outside network:

  • Click on the Enable SSL launcher and select your domain.
  • Once completed, try going to your website again from an outside network.
    • If successful you should see a closed Padlock , the word secure and https in your domain name.
    • All traffic to and from your website is now encrypted using an SSL certificate from Let’s Encrypt.
    • The certificate will automatically renew itself.

Step 9: Your Finished! Customize Your Website and Check out recommended plugins.

Congrats! Your site is live!

This section will serve as a very brief crash course to WordPress.

WordPress has a HUGE community of support so if you have any questions, search online for article or videos, there’s a ton of great information out there.

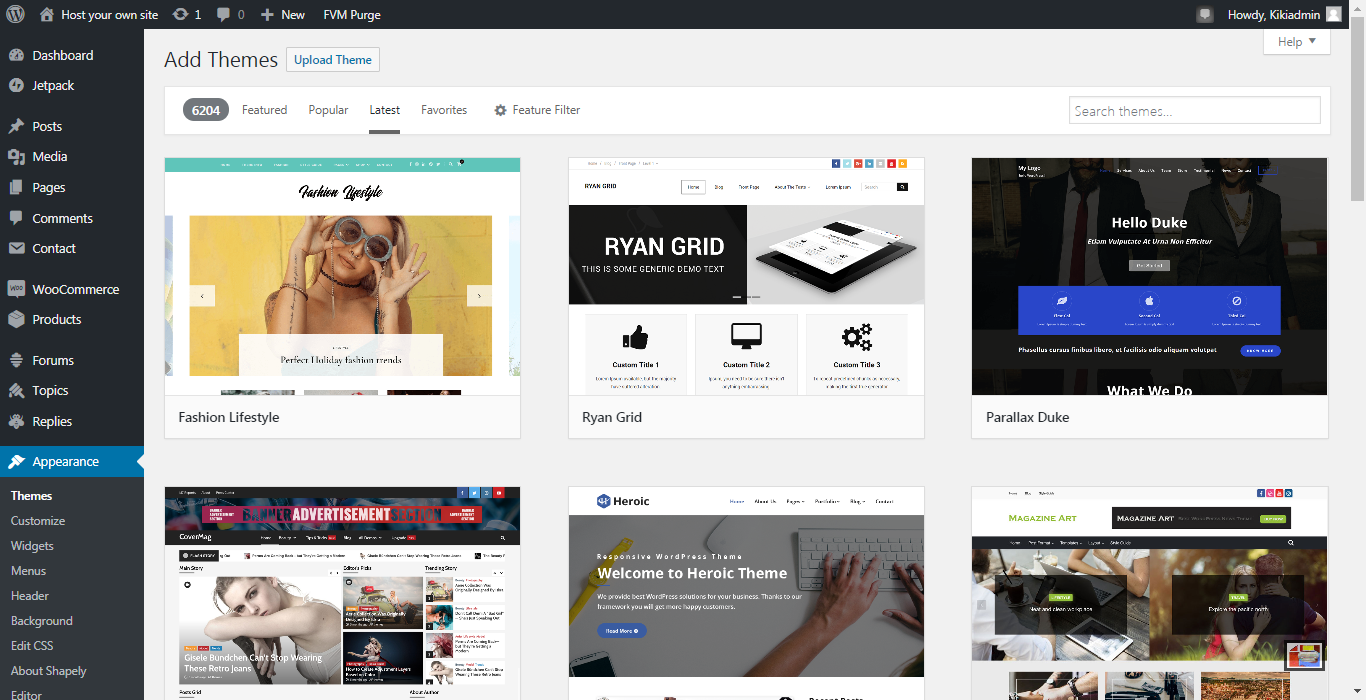
  • Change your Theme

    • Under Appearance > Themes , you can select from a variety of different themes to suit your desired style.
    • Some themes are free and some are paid.
    • Some themes offer demo content on their websites which you can download and then upload so that your theme can look like their examples.
      • Check out this site’s theme’s demo content Shapely.
  • Upload Media
    • You can upload photos, videos and more to your site but a first word of caution:
      • Using large files on your website will slow your site down significantly. The average size of a webpage is less than 2 mb, this site’s landing page is 1 mb.
      • Don’t use high resolution photos, scale your pictures only to the size you need and use compression- Run your photos through TinyPNG.
      • Try not to host video’s directly on your website, instead upload them to a content host such as YouTube and then imbed the video player on your site.
    • Don’t forget to add appropriate file names, captions and descriptions, it will help your search rankings.
  • Posts and Pages,
    • Posts and pages function pretty similarly but have some subtle differences depending on your theme.
    • Pages are more meant for content that is permanent and integral to the structure of your site such as, the About me, store front, shopping cart, contact or a restaurant Menu page.
      • They often don’t come with a comments section and leave out the time and date a post was created because its not as important.
    • Posts are more meant to serve as articles and often include a time, date, author and comments section, this page is a post, but it could have easily been a page.
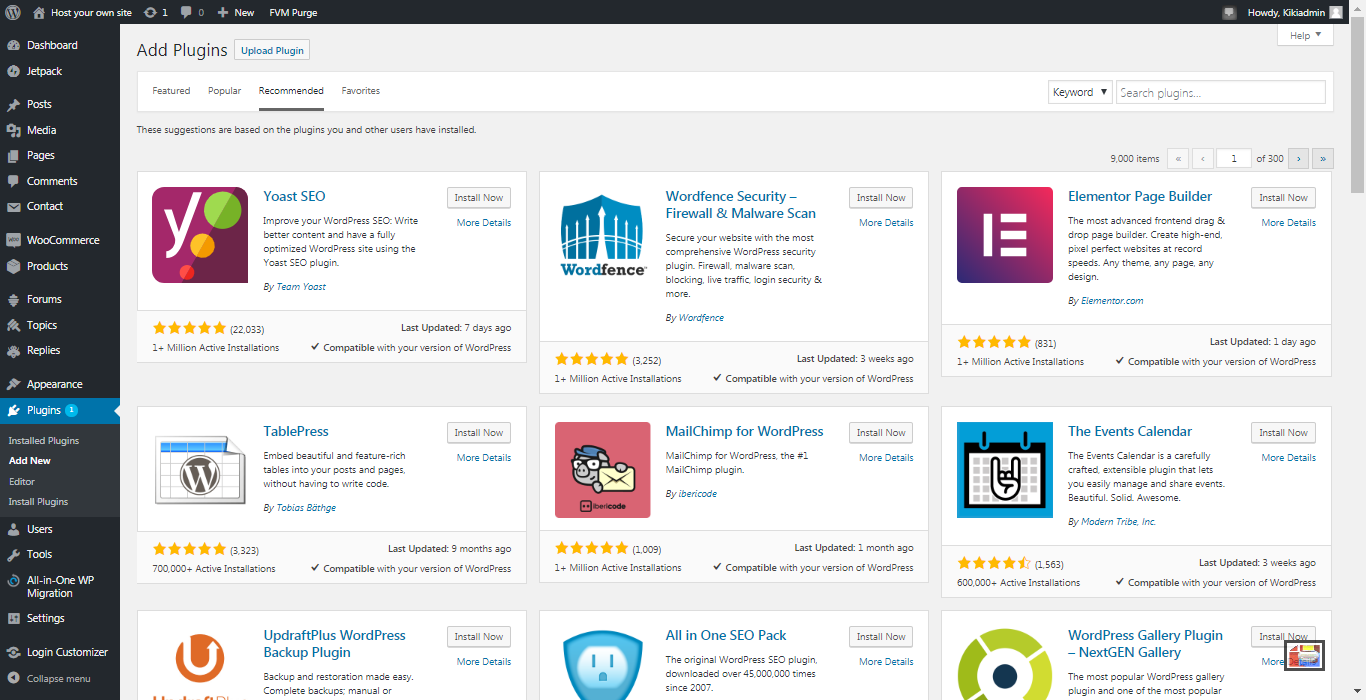
  • Plugins

    • This is where WordPress give you more control than other website builders.
    • If you can think up some added functionality for your site, its likely that someone has already made a plugin for it, some are free and some are paid.
    • Be sure to check the reviews as poorly written plugins can negatively affect your site’s functionality.
    • We recommend
      • Fast Velocity Minify, for reducing http requests and speeding up your site (preinstalled).
      • WP Mail SMTP, So that WordPress can send mail using your email accounts (preinstalled).
      • Nginx cache sniper, for clearing your cache when updates are made (preinstalled).
      • WooCommerce, for a well supported eCommerce site.
      • Jetpack, for site downtime monitoring, statistics and more.
      • All-In-One WP migration, for backing up your site or moving it to another server.
      • Want a drag and drop experience? Checkout Elementor or Page-builder.
      • WP Super Cache, for further caching content and speeding up your site.

That is it, have fun!

Step 10: Configure Additional features: Automatic Website Backups, Website down monitor, etc...

  • Automatic Website Backups

    After your website is installed it will automatically be scheduled for backups every night, with only the last 2 days of backups being stored.
    You can find these backups in the MicroWebPi/Backup/YourWebsite_Archived_Backups Folder.

    It is highly recommended that you change the save location for your backups to an external device like a flash drive or hard drive.

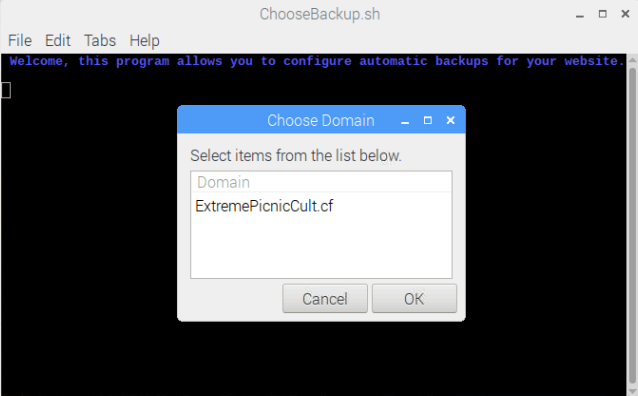
    You can change the save location, backup frequency and number of backups by clicking the Backup Websites Utility on your Desktop.

    First Select the Website you would like to backup.

    You can select to create a one time backup but for this example we are going to select Update Scheduled Backups.

    Next select your desired automatic backup frequency and the maximum number of saved backups.
    You can select to have the backups performed from every 1-31 days, backups will be performed during the night from 1:00 am -3:00 am.
    Enter 0 to stop automatic backups for this site.
    Be sure to be mindful of your available disk size when selecting the maximum number of saved backups.

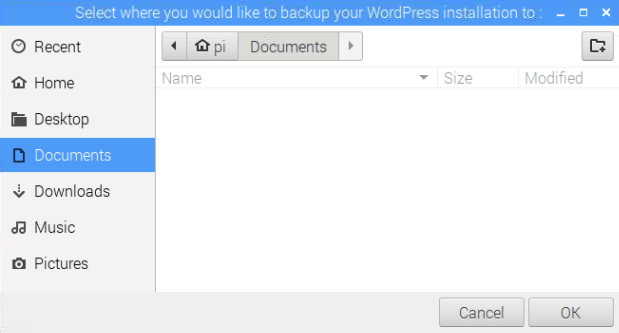
    Next select your desired storage location, it is highly recommended to select an external device such as a flash drive or external hard drive so that if the internal storage device fails, all will not be lost.

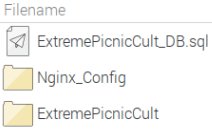
    Your backup consists of your WordPress root folder (named after your domain), the SQL database and the NGINX virtual host configuration. They are all compressed in a zip file for efficiency.

    You can later run the MicroWebPi Installer and select the Restore option to restore your backup.

    Enter the information below and later select your backed-up WordPress root folder and database file to restore your website.

  • Telegram Website Down Watchdog with Fallback Protection
    The Website Down Watchdog will monitor any website and send you a message via the Telegram App if the website goes down.
    The Fallback protection option will allow a secondary MicroWebPi to take over as the main server if it detects that the main server is down.

    Click on the Enable Watchdog Icon on the Desktop to begin.

    To create your Bot we will need just 3 pieces of information: The website you want to monitor, your Telegram Watchdog Bot Authorization Token and how often you want the website to be checked. We will obtain the Authorization Token in the following steps.

    First, download the Telegram messaging app on your phone. We are going to create a Bot that will message us when our site is down.

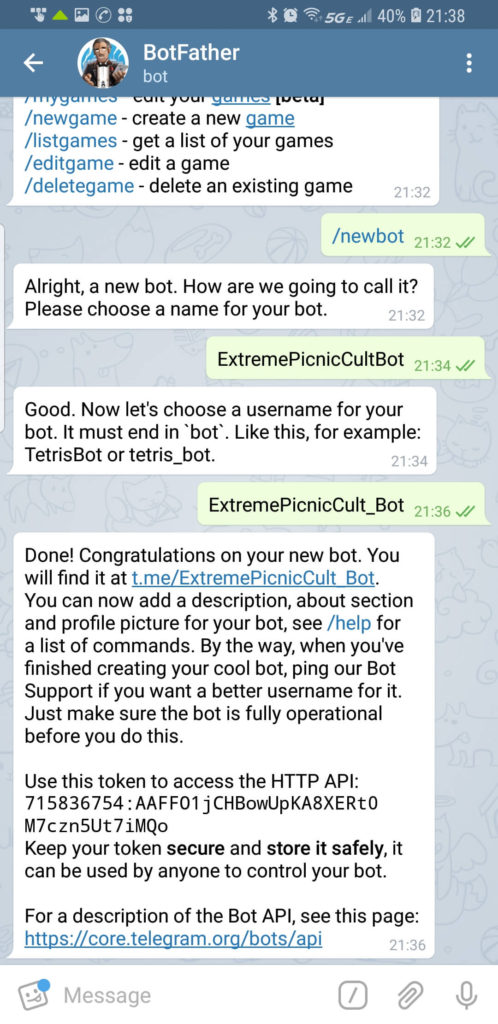
    Open the Telegram app, create your own personal account if you don’t already have one and then search for BotFather.

    Send BotFather “/newbot” to create a new bot.
    Then enter the desired name of your new bot.
    Then enter a username for your new bot (must end in bot)
    Boom! Bot Father will give you the authorization token for your new bot copy this but don’t enter it into the installer yet.

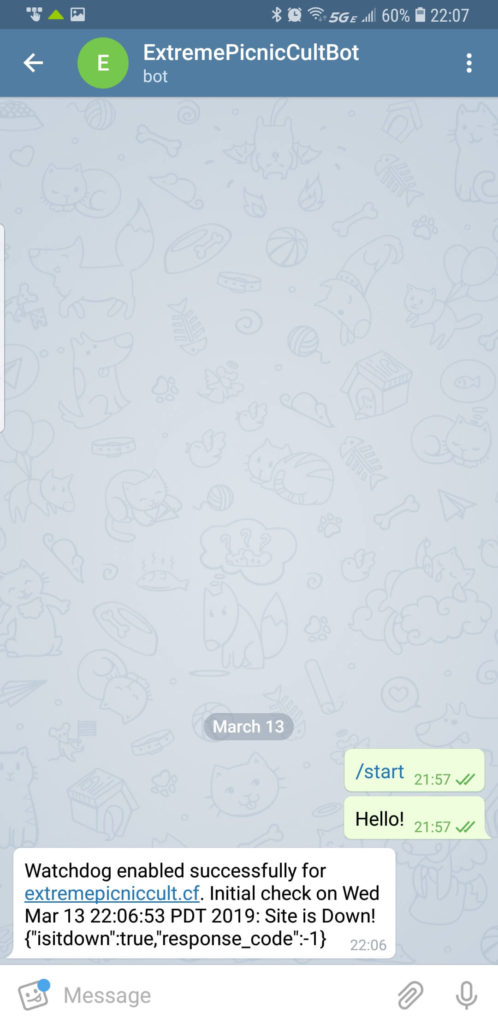
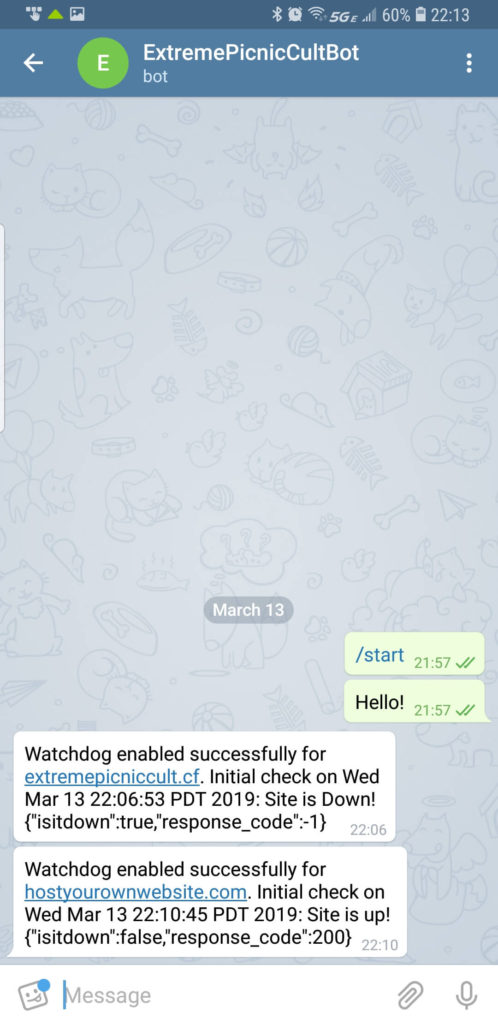
    Before you enter the authorization token into the Enable Watchdog Utility, we first need to search for your new bot and send it a message from your phone. You can send any message, in the example below “Hello!” was used, this will let your new bot know who to send update messages to.

    Now you can run the Enable Watchdog utility on your MicroWebPi and enter the authorization token.

    You will then be asked if you want to enable Fallback protection. This is typically used if you want to provide redundancy to your MicroWebPi by having a 2nd MicroWebPi located somewhere else. It requires you to have DYNU DDNS updating enabled. The secondary MicroWebPi monitors your site and when it detects that it is down it will redirect traffic to itself by updating DYNU’s DDNS Service.

    If everything goes well, then you should receive an initial message from your Bot saying that Watchdog Configuration was successful.

    You can repeat the process using the same Authentication Token for additional Websites, just don’t forget to send your bot a message before running the Enable Watchdog utility.

  • Add File to Webroot
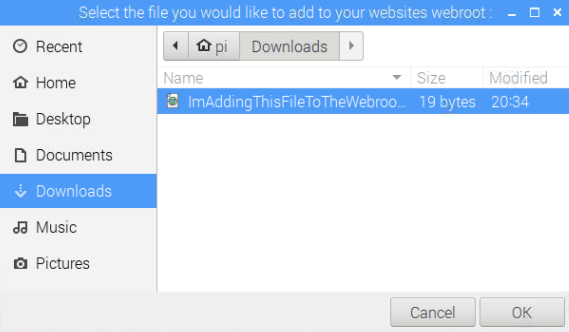
    This Utility is used to add files to your websites root location.
    This is often used for 3rd party services that require domain verification

    Its as simple as selecting the domain you would like to add the file to and then selecting the file you want to upload. In the example below we will add a file named “ImAddingThisFileToTheWebroot.html” to the domain “ExtremePicnicCult.cf”.

    After you add the file to the webroot you can verify that it is there by going to its address: “ExtremePicnicCult.cf/ImAddingThisFileToTheWebroot.html” and if it is successful, you should see the contents of the file on your web browser.